Help removing gearbox from shaft.

Ralph, call me.
 
You ever see how pulleys have another set of holes in them, you remove the bolts that hold the bushing in place and put them into the pulley and tighten them and that helps pull the pulley off of the bushing/shaft.

I wonder if you could so something similar?

Maybe put a nut with a large washer between the gearbox plate and the engine with a bolt going from the gearbox side into the nut so when you tighten the bolt into the nut, it pushes the bolt through it touching the washer or other piece of metal larger than the bolt so the pressure is spread out some and with several of these on sides of the pump, maybe that will slowly push the gear box off of the engine?

Kind of like using a gear puller but different as you are pushing from behind the gear box against the engine.

I don't know of the engine itself can handle the pressure, maybe it might using large washers or small plates of metal as the bolts themself are small and might punch through the engine, plates or large washers might avoid this.

Just an idea.

Good luck.
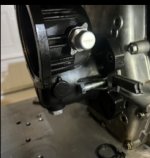
I did something very similar. I cut some little shims and ending up stacking them and going little by little until I could put a 2x4 in and then continue with the shims against the wood. (Wish I could post a clearer picture, file size was too large so I had to screenshot my photo library and crop it that small, but you get the idea.)
 

Attachments

  • IMG_9684.jpeg
    IMG_9684.jpeg
    58.5 KB · Views: 1
Creating a comprehensive manual for changing a gearbox on a pressure washer would require detailed information about the specific make and model of the pressure washer you're working with. Gearbox replacement procedures can vary significantly between different pressure washer brands and models. However, I can provide you with a general outline of the steps involved in changing a gearbox on a typical pressure washer. Please consult your pressure washer's user manual and manufacturer's guidelines for precise instructions related to your specific unit.

Pressure Washer Gearbox Replacement Manual

Safety Precautions:
Before you begin, it's crucial to prioritize safety:

  1. Read the User Manual: Familiarize yourself with the manufacturer's instructions and safety guidelines in the user manual.
  2. Turn off the Power: Disconnect the power source and ensure the pressure washer is completely powered down.
  3. Protective Gear: Wear appropriate personal protective equipment (PPE) such as safety glasses, gloves, and hearing protection if needed.
  4. Work Area: Ensure you have a clean and well-ventilated work area with adequate lighting.
Tools and Materials:Gather the necessary tools and materials, which may include:

  • New gearbox assembly (compatible with your pressure washer)
  • Wrenches and sockets
  • Screwdrivers
  • Pliers
  • Allen wrenches
  • Replacement seals and gaskets (if required)
  • Lubricants or greases (as specified by the manufacturer)
Gearbox Replacement Steps:

  1. Preparation:
    a. Position the pressure washer on a flat and stable surface.
    b. Remove any dirt or debris from the pressure washer to prevent contamination during the repair.
  2. Access the Gearbox:
    a. Depending on your pressure washer model, you may need to remove the protective covers or panels to access the gearbox.
  3. Disconnect Power:
    a. Ensure the pressure washer is disconnected from the power source to prevent accidental start-ups.
  4. Drain Oil (if applicable):
    a. If your pressure washer gearbox uses oil, drain the oil into a suitable container and dispose of it properly.
  5. Remove the Old Gearbox:
    a. Use the appropriate tools to detach the old gearbox from the pressure washer. This may involve removing bolts, screws, or other fasteners.
    b. Carefully disconnect any electrical or mechanical connections to the gearbox.
  6. Inspect and Clean:
    a. Inspect the gearbox mounting area for any damage or excessive wear.
    b. Clean the area thoroughly, removing any debris or old gasket material.
  7. Install the New Gearbox:
    a. Place the new gearbox in the correct position, aligning it with the mounting holes.
    b. Reattach any electrical or mechanical connections as necessary.
  8. Secure the Gearbox:
    a. Carefully tighten the bolts or fasteners to secure the new gearbox in place. Follow the manufacturer's torque specifications if provided.
  9. Replace Seals and Gaskets (if needed):
    a. If your pressure washer uses seals or gaskets, replace them as instructed by the manufacturer.
  10. Fill with Lubricant (if applicable):
    a. If your gearbox requires lubrication, fill it with the specified lubricant to the recommended level. Refer to the manufacturer's guidelines.
  11. Reassemble:
    a. Reassemble any removed protective covers or panels.
  12. Test:
    a. Reconnect the power source and run the pressure washer for a short test cycle to ensure that the gearbox is functioning correctly.
  13. Final Checks:
    a. Check for any oil or lubricant leaks.
    b. Listen for any unusual noises or vibrations.
  14. Maintenance:
    a. Regularly check and maintain the gearbox according to the manufacturer's recommended schedule.
  15. Dispose of Old Parts:
    a. Properly dispose of any old or replaced parts and any waste materials in accordance with local regulations.
Remember that this is a general guideline, and the specific steps and precautions may vary depending on your pressure washer model and manufacturer. Always refer to your pressure washer's user manual and follow the manufacturer's instructions for the most accurate and safe gearbox replacement procedure. If you're not comfortable or experienced with this type of repair, it's advisable to seek assistance from a qualified technician or the manufacturer's service department.
 
Back
Top